Tape your original drawing to a bright sunny window with your low tack tape. Tape your good piece of paper over top. It's probably a good idea to make the good paper larger than the scrap paper. It will give you extra should you decide to frame your masterpiece or make additions to the setup. You will be using your window as a low tech light box.
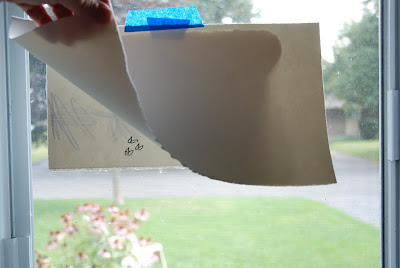
Now GENTLY trace the image onto your good paper. DO NOT PRESS HARD! If you press too hard or use a hard leaded pencil it will impress a line in the paper to which the coloured pencil will glide over not leaving any colour. This is a technique we will be using later but not at this time. Also avoid using a pencil that is too soft as it will be more difficult to erase. I like to use a B lead.
You may wonder why we are bothering with this step and not sketching out our good copy directly onto the good paper. The less erasing and pencil marks you put on your good paper the better. Erasing flattens the tooth of the paper thus making it unable to take as much coloured pencil as you may like. The key to creating a coloured pencil painting with depth is to layer the colours on top of one another. For example we will use blue as our first colour to create the dark shaded side of the apple. We'll then layer various reds to give it depth and closer resemble the colour of an apple.
Now you are ready to start colouring. All of the lines you currently have on your paper will eventually be erased to be replaced by coloured pencil. In the end when your picture is done it will be all shading and no lines.
NEXT TIME:
Before we can actually tackle the apple we'll need to go over a few necessities. I'll post some examples of coloured pencil techniques, strokes used and suggestions. The meat and potatoes of the process as it were.
What you will need:
*a kneaded eraser
*coloured pencils (two colours would be great. I suggest Indigo blue and Tuscan red from the Prismacolour premier series collection. These can be purchased open stock for approx. 1.50 per pencil (Cdn) SEE NOTE BELOW
*Something pokey. A spent ball point pen, stylus, toothpick...you get the idea.
*A small piece of your good paper
*Chocolate (We're past the dog stage)
There are many good quality pencil companies out there. You need an artist quality pencil, not the student quality ones. Derwent and Faber-Castell also have wonderful pencils. If you choose one of these then pick a dark blue and brownish red. (heavier on the red side than brown.) These are two of the colours you will actually use to colour your apple when we start.

4 comments:
YAY, next lesson is up! I couldn't get hold of the Stonehenge or Bristol vellum but I did manage to get some Mi-Teintes...I hope it will suffice. :) Chocolate....mmmmmmmmm!
Mi-Teintes are good. They have even more tooth so you may be able to really put the layers on thick.
Thanks for the tip. :)
Okay, I did this stage today. :) I'm feeling quite nervous about the next stages though when we will actually be applying the colour.
Post a Comment