Wednesday, 30 September 2009

;-0


I suspect my charcoal/red chalk sketches from this mornings class will soon be sporting sticky notes in the more delicate areas of the works. I managed to snap a picture before the little prude crew gets to them. Next week will be even more offensive to them. We're sketching men;-)

Monday, 28 September 2009

Ahhhhh! Done!

Fallen I
11.5"x 8.75"
Coloured Pencil
Now off to the framer then up for sale. Since the trees are about rain down amazingly colourful models in the next couple of weeks, I've made this the first in a series of fall paintings. I've spoken to so many people of late that have declared their love of fall. "It's my favourite season!" It is probably the most beautiful one around here.

Friday, 25 September 2009

Baby Goldfish


My babies are growing up...[sniff]

This is the latest batch. There's about 21 or 22.

Our kind hearted neighbour was watching our last batch over our holidays and something went wrong. This batch is about a month old now and are a bit smaller than my nail on my baby finger. They have very little colour with only speckles of washed out black and pale yellow starting to show. One little fellow has some orange.

I transferred them to a larger tank today. They can't leave the water at this age in a net. It may cause deformations in the tiny fish so they have to be transferred in water to the new tank. I used a net to scoot them into a small pot for the transfer.

I added water from my large goldfish tank and their own baby tank water to fill the new tank up about 6 inches full. I'll gradually increase the level as they continue to grow. I keep a bag of the white ammonia filter material in the tank. This seems to keep the pollution level down since I can't put fresh water in the tank. (Our city water kills 'em every time regardless of how much water treatment I put in.)

They still only get frozen baby brine shrimp to eat once or twice a day. Once the filter is running I can add some dried fish food to their diet. If I do so sooner it seems to pollute the water quickly killing the fish. The frozen baby brine fish doesn't seem to have this effect. They are still a wee bit small to start the filter in the tank running so I will keep a bubbler going until they are larger.

As soon as I dropped the water in the large tank by about only 1 inch the large fish started to attempt to breed again. Unbelievable! I didn't even add new water to trigger this behavior. I've never seen this before. Usually they only breed in late Winter to early Spring.
The last time I had two batches separated by only a couple of days in the same tank, the older batch tried to eat the smaller ones and picked on them relentlessly. They are basically swimming stomachs.
Their Grandmother was a Callico Ryunkin and their Grandpa a Black Moore. None of the second generation had the moore bug eyes. Some had the ryunkin flashy scales and many were a beautiful chocolate colour. The Mom is a chocolate and orange coloured huge ryunkin shaped fish with a beautiful long flowing chocolate coloured tail. I believe the father is a white ryunkin with a yellow head, but time will tell.

Thursday, 24 September 2009

The Next Coloured Pencil Demonstration is Coming! I Promise!


Okay. I cheated. Instead of working on the apple to post on the blog I've been drawn to drawing other things. I will be starting the apple later today.
Yesterday was my first expressive drawing class. At least that I decided to attend. It started off as one of those mornings. You know.....you get to the building weighed down with portfolio's and bags of art equipment to find the elevator is out of operation then drop off your stuff and head to your favorite mom and pop coffee shop in the area to find that it's closed down for renovations and have to go to a major chain on instead. You trudge back upstairs, spill your Mocha on your shorts like you just learned to drink from a big person cup, set yourself up and wait. Wait, wait, wait, wait. The model is running late.
As you wait you have a moment to look around the room. You start to feel the butterflies build in your stomach as you realize you don't see the familiar faces from last years classes. You find you are seeing the "big guns." This year it seems all of the seasoned artists are brushing up on their drawing skills. The ones that actually have sold art or make a living as artists. I recognize some from seeing their work previously. Not one beginner in the class. Yikes!
The instructor enters the room. He is new to me and temporarily replacing my regular one for a month or so. Will he yell? Insult? Throw a tantrum? It's been known to happen I've heard of some of the instructors. I've not heard anything about this one.
Turns out it was a perfect class. I've never turned out a work as easily as I did this day. The instructor was incredible! I didn't feel my work was out of place amongst the seasoned artists. I felt relief! I can't wait for next week!

Monday, 21 September 2009

I am standing in the middle of the river. Usually I'm on top of the bridge. It seemed like a good idea at the time, to trudge down and rock skip to look at the bridge from below. This is the only time of the year when the water is low enough to do this. I'm facing the Ontario side.
Looks simple enough, right? NOT! I couldn't find the pathway to the shore once I got back to the tree line.


Quebec side of the river. The trees will be flaming red and orange in about a week or two. This week is supposed to be hot. I'm willing to trade colourful foliage for heat. At least until December;-)


Wednesday, 16 September 2009


My "Expressive Figure Drawing" class started today at the art school. I was very excited until I learned the first class would be given by another instructor and would be a field trip to the art museaum to look at a famous Canadian photographer's work with a focus on portraits. I stayed home to continue on a drawing I'm working on instead.

It was not the most successful day artistically speaking, but stiff upper lip, tomorrow's another day and all that. Some days are like that. I was practicing doing apples and ripped the paper. Now I have two large apples on a little paper. Sigh.
The positive bit to all of this is that I was able to re-introduce myself to green. I haven't used much green since I work primarily with skin tones and was finding it a bit intimidating at first. By the end I was loving green. The green apple has about 13 different colours of green pencils, 2 yellow, 2 blues, brown and tuscan red. It was invigorating once I realized it would indeed look like a green apple. Now the red apple was another story!
I have the colours for the red apple for the demonstration and will post them soon. If it weren't so darn complicated I'd do green, but that's a lot of pencils required!

Thursday, 10 September 2009


I suppose by the time I get to read the current edition of the OPE zine it will be a wee bit dog-eared. Who knew the coloured cover flavours matched their milk bone counterparts!

Wednesday, 9 September 2009

Coloured Pencil - Part III
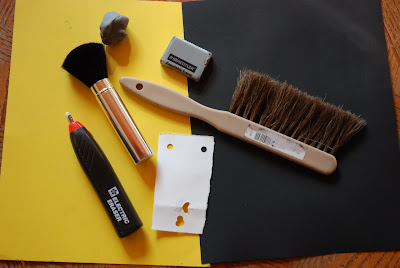
Useful Tools

Useful tools include some sort of soft brush or your own hot air to blow/brush away any pencil crumbs that can mark your paper in places you don't want it to; kneaded eraser to pick up colour by dabbing it on the place you want to lighten (I'll demonstrate as required when working on the painting.) and a paper with a hole punched out of it to assist you in determining whether or not your values are correct; If you happen to have an electric eraser around you are a lucky person and although it's not required, is a whole lot of fun. I use mine for blending as well as erasing and want to be burried with it when I die.
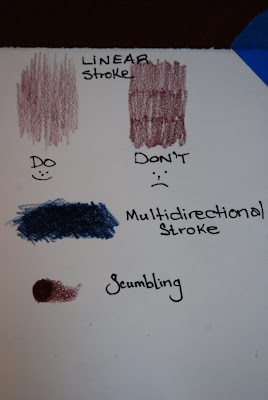

Pencil Strokes


Here are the pencil strokes you will use for this particular painting.
Linear Stroke: Is simply colouring in straight lines. Try and vary where they start and stop otherwise you will develop a line at the top and bottom of the area you are colouring. You can keep your pencil touching the paper the whole time. This is a nice fast way to cover an area with colour. The amount of pressure you put on the pencil will depend on how much colour you want to apply on that layer. I'll let you know as we're going along how much pressure to apply.
Multidirectional Stroke: Is very similar to the linear stroke only you switch directions with each layer. This gives you a nice even coverage with no visible directional lines.


Scumbling: What a word! It is indeed a proper colour pencil term meaning working in small tight circles. It is time consuming, but will give you the best coverage. You require a sharp pencil for this stroke for the best effect. The more layers you put on top of each other the less tooth the paper has. This is a great stroke for something that should have none of the paper showing through.


Follow the Contour


When we are using the above strokes we will still be following the contours of our object. You would not draw in straight vertical lines when colouring a curved object. You can still do a "linear stroke" while following the contour of our apple.
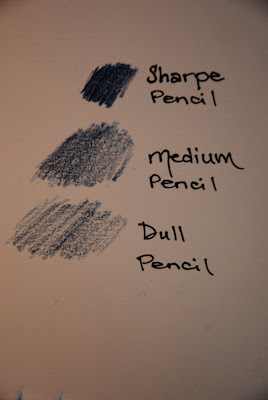
Sharpness of Your Pencil


The sharper the pencil the better coverage you will get. Dull pencils tend to just slide over the tooth of the paper leaving a lot of the white. Sometimes this is valuble but for most of our painting we will require a sharp or medium sharpened pencil.
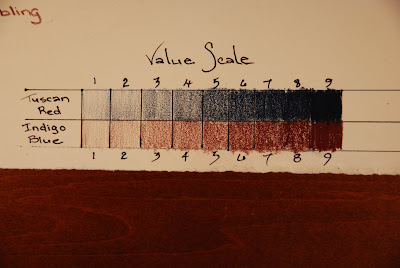

Value Scale


Okay....switch the names around then this will make more sense. Not enough coffee today I guess. Tuscan is the bottom scale and Indigo is the top scale.

You don't acually need to make a value scale, but they are useful and good practice. They will help you get a feel for how hard to press your pencil to get the value you want. You may already have some experience with creating value scales. If not, then basically you decide on a number of values (lightness and darkness) you would like to be able to obtain with one colour. You draw it at the lightest you can at one end and darkest at the other. Then fill in what you determine would be a good middle value. Then you fill in the rest going from lightest to darkest or vice versa. This will assist you to determine which value best matches the part of the photo you are drawing.
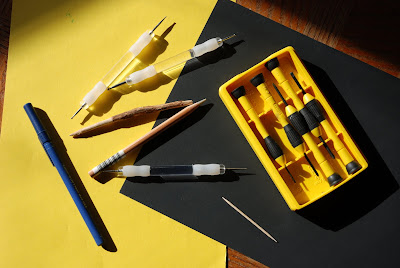
Impressed Line


We will use impressed line to put the little pale dots on the apple. It involves using a pointy object to impress a small area, a dot, line, etc.... into your paper. Make sure the object is not sharp enough to cut through or score the paper. You just want to be able to "dent" the paper enough for the pencil to slide over the top of the paper in that section. If you use a spent pen make sure that there is absolutely no chance that any ink will come out otherwise you will ruin your painting. At this point you should each chocolate and start again at the beginning.


To impress a line use a piece of wax paper or tracing paper between your good paper and the stylus so that the stylus will in no way leave any undesirable colour marks behind. With a firm but not manic amount of pressure impress the lines, dots, etc... that you want to appear. Sometimes it helps to have them drawn out so you can see exactly where they are going.


When you colour over the area you just impressed it's better to do so with a medium or duller pencil. You don't want to press into the impressed area with a sharp pencil or it will fill it in. On the otherhand, if you have impressed something in error, using a sharp pencil to fill in the impression is just what you want to do!

The last technique I want to quickly mention here is burnishing. This is akin to polishing your painting when it's done. If you use Prismacolor pencils they are wax based. When you have all of the layers and colours you want on your apple you can use a "colourless blender" which is a coloured pencil with no colour or a tissue or your dry finger. You polish the areas you want to shine and voila! It's all shiny just like a real store apple only without the pesticides!

If you put your painting aside at any point and notice when you come back to it that it looks duller or have a whitish film, this is called WAX BLOOM. You can re-polish it and the wax that has risen to the top will be removed once again showing the coloured pigment. The only way to totally avoid this is to spray your painting with a fixitive when you are completely done.

Wax bloom occurs generally when you are using dark colours or heavy layers of colours. The wax rises to the top and the pigment settles down below.

NEXT TIME:

Prepare to colour! I will post the pencil colours required once I start the painting myself and determine which ones we will require. The particular ones I choose may not be what you decide to use. Variety is the spice of life right?! (Mr. P. ....Ignore that last comment. It's not meant for you!)

Now....Go and eat some chocolate. I know I'm going to!

Tuesday, 8 September 2009

Coloured Pencil - Part II

Now that you have your outlined copy of the photo on a scrap piece of paper it's time to put it on your good paper. Hopefully you have a piece of "Stonehenge" or "Bristol (vellum)" or other paper with a good tooth.


Tape your original drawing to a bright sunny window with your low tack tape. Tape your good piece of paper over top. It's probably a good idea to make the good paper larger than the scrap paper. It will give you extra should you decide to frame your masterpiece or make additions to the setup. You will be using your window as a low tech light box.
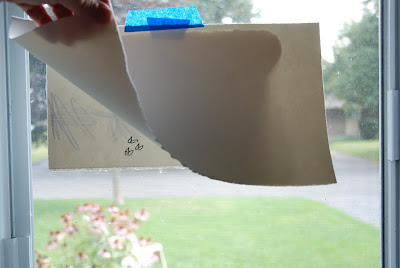

Now GENTLY trace the image onto your good paper. DO NOT PRESS HARD! If you press too hard or use a hard leaded pencil it will impress a line in the paper to which the coloured pencil will glide over not leaving any colour. This is a technique we will be using later but not at this time. Also avoid using a pencil that is too soft as it will be more difficult to erase. I like to use a B lead.


You may wonder why we are bothering with this step and not sketching out our good copy directly onto the good paper. The less erasing and pencil marks you put on your good paper the better. Erasing flattens the tooth of the paper thus making it unable to take as much coloured pencil as you may like. The key to creating a coloured pencil painting with depth is to layer the colours on top of one another. For example we will use blue as our first colour to create the dark shaded side of the apple. We'll then layer various reds to give it depth and closer resemble the colour of an apple.


Now you are ready to start colouring. All of the lines you currently have on your paper will eventually be erased to be replaced by coloured pencil. In the end when your picture is done it will be all shading and no lines.

NEXT TIME:

Before we can actually tackle the apple we'll need to go over a few necessities. I'll post some examples of coloured pencil techniques, strokes used and suggestions. The meat and potatoes of the process as it were.

What you will need:

*a kneaded eraser

*coloured pencils (two colours would be great. I suggest Indigo blue and Tuscan red from the Prismacolour premier series collection. These can be purchased open stock for approx. 1.50 per pencil (Cdn) SEE NOTE BELOW

*Something pokey. A spent ball point pen, stylus, toothpick...you get the idea.

*A small piece of your good paper

*Chocolate (We're past the dog stage)

There are many good quality pencil companies out there. You need an artist quality pencil, not the student quality ones. Derwent and Faber-Castell also have wonderful pencils. If you choose one of these then pick a dark blue and brownish red. (heavier on the red side than brown.) These are two of the colours you will actually use to colour your apple when we start.

Wednesday, 2 September 2009

Free Coloured Pencil Lesson - Part I - Line Drawing

You may notice I have been procrastinating with putting up the free coloured pencil lesson I promised. I was going to try and post the whole thing at once but find that a bit daunting and time consuming. (It might interfere with my Starbucks time!) So I'm breaking that part of my promise and going to do it in sections.


Part I:


You Will Need:


*scrap paper
*pencil
*eraser
*thin black marker
*prayer
*your dog
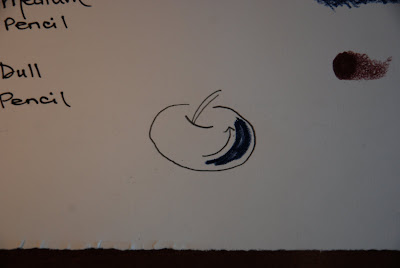
Draw the outline of an apple on a regular or scrap piece of paper. I've had people tell me they can't do this. Apples aren't any more perfect than the rest of us and come in many shapes and sizes. If it's not exactly the same as my photo don't worry, they'll both be equally as unedible in the end. Make sure it's the size you want the painting to be because this is the pattern for the good copy.


I drew my apple and wasn't happy with it. So now it's a dog toy.


Once you get a line drawing you are happy with and feel you can work from, use your black marker to outline all of the pencil marks. Make sure you also draw the line to indicate where you will put your shading and shadows as well as circling the area of the apple that will appear shiny and remain white.
You may have noticed the photo has 4 apple seed where I drew only three:-0
Artistically speaking, things show better in odd numbers. It's more aesthetically pleasing. However if you are suffering from Obsessive Compulsive Disorder and must have things in even numbers please feel free to add the additional seed.
Now I'll go fix my good rough copy and get ready for the next step.
Next time you will need:
*a pencil (preferrably a B)
*eraser
*"Stonehenge" or "Bristol" (vellum) or good quality paper with tooth. Canson Mi-tentes are okay, but have a bit too much tooth. White is the best but off-white will do. Natural colour is not good. You want your shiny highlights to be white without having to actually use a white pencil.
*low tack tape such as painters tape or other masking tape.
*More prayer
*a dog again....just in case.
*A window on preferably a sunny day. (No, really.....I'm serious!)