Friday, 23 October 2009

Parliament Hill - Again


You can click to enlarge any of the above photos.

One of the arches pictured (third picture from the top) has various animals carved on the stone.  This is the memorial room which includes the names of those who served and died in the various wars and conflicts.  This includes the animals which served as well.

Now the purpose of the gargoyles???  I believe they are there for the protection of the building.  Although they are too difficult to photograph, they litter the top outter side of the building.

You also find carvings of the faces of various men who built the buildings and a multitude of creatures both real and imagined inside.  I'm not sure what got to that squirrel, but whomever carved him mustn't have been fond of the creatures.

Thursday, 22 October 2009

Parliament Hill


"Hot Chocolate" and I went downtown today to shoot our photos.  Digital cameras don't have a very long life span in rainy weather, so once the mist turned into something more substantial we worked our way to Parliament Hill.

The Unicorn is right at the main entrance with a lion guarding the other side.  Gargoyles gallore throughout the structure as well as a multitude of animals and faces carved in the stone.  The domed building is the Parliamentary library which was the only structure that survived the big fire.  We went up to the top of the Peace Tower, just below the big clock for a stunning view of the city.  Even the bathrooms are marble and stone.  Just the kind of ritzy place you don't mind "visiting", unlike most public washrooms.

Wednesday, 21 October 2009

The Good, The Bad and the Toad


SOLD

It started off as a bad art day.  I wore the wrong jeans that were new and smelled strongly of dye.  This effected my concentration level in my art class.  Not nearly as much as the very young fidgity model that looked a little too much like one of my daughters.  That was the first class in which I truely felt uncomfortable.  Although I know she had to be of a legal age to work as a nude model, I just couldn't get the urge to go and cover her up to go away.  I wanted to ask her,
"Does your Mother know what you do?!"  All the while telling everyone who inquires about this class I take  that the body is beautiful and there's nothing wrong with tastefully drawn nudes."  They just shouldn't look like any of MY family!

I was (and still am)  annoyed with Kurt for winding down his blog "Other People Exist."  Doesn't he know how hard it is to find a good read out there!  Especially one with a twisted, dry, quirky sense of humour such as his.  Please feel free to tell him how I feel on my behalf.  In fact I encourage it!  Let him know as a loyal reader of four years how much I think this whole business sucks!  He's not the first quitter.  They seem to be dropping of late.  I was almost amoungst them!  I miss the ones that have gone and hate the thought of looking for new ones as my pool of blogs that I read diminishes.  4 YEARS!

I went to my happy place in Aylmer expecting to continue my cranky day, but it was not to be.  The owner of Vieille Alliance in Aylmer always is a ray of sunshine on a cranky day.  Today when I was switching the art a customer came in and inquired about  "Cou Cou" (it's French name) or "Toadally Caught" (it's English name.)  It has been sold.  Once the formal sale has taken place I'll update my art website.

Well, that's the good and the bad.  And don't forget to go and give Kurt a piece of my mind.  I'd appreciate it!

Monday, 19 October 2009

Perpetual Chocoholic


Sunday, 18 October 2009

Unnamed-Still in Progress


About 3/4 complete.  Lots of tidying up to do on this one, not to mention the tricky catepillar bits.  Then back to the leaves.  Oh yes!  And an apple I promised!!!

Friday, 16 October 2009

Right!

There is a theory which states that if ever anyone discovers exatly what the Universe is for and why it is here, it will instantly disappear and be replaced by something even more bizarre and inexplicable.

There is another theory which states that this has already happend.
--Douglas Adams--


I believe I may be spending too much time exercising the right side of my brain, drawing, painting, working (artistically speaking.)  I am under this assumption because yesterday on my way to buy myself some shirts and chocolate chips at the grocery store, I saw a lady walking a rather large penguin down the street on a leash and didn't think this too odd. 
My first thought should have been:
"Take another look because it's not possible since we have not even one penguin carrying zoo in this city, or really any zoo for that matter!",
It was instead:
"Oh!  Isn't that cute!  What a lovely picture that would make."

The last time I knew I was spending too much time on art and not enough on math and other left brained activities I was also at the grocery store and having forgotten my list, was trying to remember why exactly I was there once I had arrived.

I started picking up items I believed could have been on my list and placing them in my cart.  As I walked down the dairy isle I had this unusual and strong urge to smell and lick the sour cream containers. 
"Bizzare!" I thought and continued onto the next isle.
It was then that it hit me!  I was here for sour cream and sour cream only.
My right brain told me in the only way it knew how.  Images and feelings.

It used to be when I started with this art stuff my left brain was much too dominant to allow my right to easily take over tasks.  When I'd sit down to paint I'd quickly grow restless and find myself thinking of all of the other chores I should be completing.  (All left brained activities by the way.)

Well, I now more easily slip into a creative mode.  My left brain realizing the futility of attempting to snap me out of right sided dominante activities.  I can easily get lost in Kairos time vs Chronos.

Well, it turns out that the rather large penguin was actually a medium sized dog with penguin coloured markings.  Once I had discovered this though, it was too late.  I need to spend my day doing some good old fashioned left brained activities to gain some balance in my thinking.  I wouldn't worry about it only my communication, driving, accounting skills all suffer when I am out of balance.  It's probably a good thing I'm house bound today!


Tuesday, 13 October 2009

The Sky is Falling!

I'm still working on posting the promised coloured pencil apple.  I've been trying to cram a lot of stuff into what time we have left.  The government keeps reminding us that we're all going to die of H1N1 if we don't get our shots and then don't actually offer them up.  They want us in enough of a panic to run to the drugstore to purchase masks and handsanitizer.  I suppose that's what's going to be credited with bring us back from the recession.  Hand sanitizer sales.


This is one of the current paintings I'm working on.  Tedious!

As you can see I don't do it in any sort of order.  I let my pencils take me where they will.  I like to work on a bit of everything at once to get an over all feel for the piece.  The only exception is the rather large creature making his way across the top of her hand.  I don't want to have the darker colours blend into the ones that will go onto him so I'm leaving him until last.

Thursday, 8 October 2009

http://artsforautism.weebly.com/

Interested in attending a charity art event?  Check out the following link.

http://artsforautism.weebly.com/

All art is raffled of to a set number of ticket holders so that every one who attends goes home with a piece of art of their own choosing. 

If you are in the city in which I live, it's for a great cause so check out the link to see how you can attend or contribute to this event.

Wednesday, 7 October 2009

Expressive Drawing


I took a class on the weekend (not at the art school) and it threw me a bit.  I was feeling quite discouraged by an exercise that we started off the day with.  At the art school I had felt like I was successfully catching on to a different way of drawing that I had been working on this past year at the school.  The weekend class forced me to return back to the method I had used previously, but found wasn't helping me advance my skills.  It made returning to the new way very difficult.

The above drawings are this weeks drawings that were definately more of a struggle than last week and not as successful in my opinion.  The drawings posted are worked quickly to capture movement and expressive posture.   I am so pleased with the instructor that we had replacing our regular one this past month that I would gladly take up one of his classes in the future.  I found I have learned much from him that has sped up the drawing process for me.

I now look forward to my regular instructor Pamela, whom I am also very pleased with returning to the class.  Hopefully the next class will go even smoother!

P.S.  In one of the photos you can see something new I'm working on.  The zebras are something we picked up at a charity art auction this past weekend.  I need more walls to hang all the art I have on.  Any volunteers;-)  (You can't have the zebra's though....they're mine!)

Monday, 5 October 2009

Uh Oh! More baby goldfish!

Uh Oh! More baby goldfish! This looks like it might be the mother of all batches. We'll see. Here's the last batch. They are now getting darker and the odd one is starting to show some orange. I assume the darker ones will resemble their mother and start off a chocolate colour.
The newest batch of eggs has been safely removed to a 10 gallon tank with a bubbler to await hatching. Two or three days after they hatch we'll start them on frozen baby brine shrimp.
I'm going to attempt to start the filter in the 20 gallon tank with the month old fish. Hopefully the water top up with city water I'll be required to do won't kill them!

Here's Mom (Cocoa) and Dad (Iris.) Cocoa used to be a solid chocolate brown colour but is now at three years old, mostly orange. Iris has turned yellow in the head but his body is pretty much the same. He's such a stud;-)

Wednesday, 30 September 2009

;-0


I suspect my charcoal/red chalk sketches from this mornings class will soon be sporting sticky notes in the more delicate areas of the works. I managed to snap a picture before the little prude crew gets to them. Next week will be even more offensive to them. We're sketching men;-)

Monday, 28 September 2009

Ahhhhh! Done!

Fallen I
11.5"x 8.75"
Coloured Pencil
Now off to the framer then up for sale. Since the trees are about rain down amazingly colourful models in the next couple of weeks, I've made this the first in a series of fall paintings. I've spoken to so many people of late that have declared their love of fall. "It's my favourite season!" It is probably the most beautiful one around here.

Friday, 25 September 2009

Baby Goldfish


My babies are growing up...[sniff]

This is the latest batch. There's about 21 or 22.

Our kind hearted neighbour was watching our last batch over our holidays and something went wrong. This batch is about a month old now and are a bit smaller than my nail on my baby finger. They have very little colour with only speckles of washed out black and pale yellow starting to show. One little fellow has some orange.

I transferred them to a larger tank today. They can't leave the water at this age in a net. It may cause deformations in the tiny fish so they have to be transferred in water to the new tank. I used a net to scoot them into a small pot for the transfer.

I added water from my large goldfish tank and their own baby tank water to fill the new tank up about 6 inches full. I'll gradually increase the level as they continue to grow. I keep a bag of the white ammonia filter material in the tank. This seems to keep the pollution level down since I can't put fresh water in the tank. (Our city water kills 'em every time regardless of how much water treatment I put in.)

They still only get frozen baby brine shrimp to eat once or twice a day. Once the filter is running I can add some dried fish food to their diet. If I do so sooner it seems to pollute the water quickly killing the fish. The frozen baby brine fish doesn't seem to have this effect. They are still a wee bit small to start the filter in the tank running so I will keep a bubbler going until they are larger.

As soon as I dropped the water in the large tank by about only 1 inch the large fish started to attempt to breed again. Unbelievable! I didn't even add new water to trigger this behavior. I've never seen this before. Usually they only breed in late Winter to early Spring.
The last time I had two batches separated by only a couple of days in the same tank, the older batch tried to eat the smaller ones and picked on them relentlessly. They are basically swimming stomachs.
Their Grandmother was a Callico Ryunkin and their Grandpa a Black Moore. None of the second generation had the moore bug eyes. Some had the ryunkin flashy scales and many were a beautiful chocolate colour. The Mom is a chocolate and orange coloured huge ryunkin shaped fish with a beautiful long flowing chocolate coloured tail. I believe the father is a white ryunkin with a yellow head, but time will tell.

Thursday, 24 September 2009

The Next Coloured Pencil Demonstration is Coming! I Promise!


Okay. I cheated. Instead of working on the apple to post on the blog I've been drawn to drawing other things. I will be starting the apple later today.
Yesterday was my first expressive drawing class. At least that I decided to attend. It started off as one of those mornings. You know.....you get to the building weighed down with portfolio's and bags of art equipment to find the elevator is out of operation then drop off your stuff and head to your favorite mom and pop coffee shop in the area to find that it's closed down for renovations and have to go to a major chain on instead. You trudge back upstairs, spill your Mocha on your shorts like you just learned to drink from a big person cup, set yourself up and wait. Wait, wait, wait, wait. The model is running late.
As you wait you have a moment to look around the room. You start to feel the butterflies build in your stomach as you realize you don't see the familiar faces from last years classes. You find you are seeing the "big guns." This year it seems all of the seasoned artists are brushing up on their drawing skills. The ones that actually have sold art or make a living as artists. I recognize some from seeing their work previously. Not one beginner in the class. Yikes!
The instructor enters the room. He is new to me and temporarily replacing my regular one for a month or so. Will he yell? Insult? Throw a tantrum? It's been known to happen I've heard of some of the instructors. I've not heard anything about this one.
Turns out it was a perfect class. I've never turned out a work as easily as I did this day. The instructor was incredible! I didn't feel my work was out of place amongst the seasoned artists. I felt relief! I can't wait for next week!

Monday, 21 September 2009

I am standing in the middle of the river. Usually I'm on top of the bridge. It seemed like a good idea at the time, to trudge down and rock skip to look at the bridge from below. This is the only time of the year when the water is low enough to do this. I'm facing the Ontario side.
Looks simple enough, right? NOT! I couldn't find the pathway to the shore once I got back to the tree line.


Quebec side of the river. The trees will be flaming red and orange in about a week or two. This week is supposed to be hot. I'm willing to trade colourful foliage for heat. At least until December;-)


Wednesday, 16 September 2009


My "Expressive Figure Drawing" class started today at the art school. I was very excited until I learned the first class would be given by another instructor and would be a field trip to the art museaum to look at a famous Canadian photographer's work with a focus on portraits. I stayed home to continue on a drawing I'm working on instead.

It was not the most successful day artistically speaking, but stiff upper lip, tomorrow's another day and all that. Some days are like that. I was practicing doing apples and ripped the paper. Now I have two large apples on a little paper. Sigh.
The positive bit to all of this is that I was able to re-introduce myself to green. I haven't used much green since I work primarily with skin tones and was finding it a bit intimidating at first. By the end I was loving green. The green apple has about 13 different colours of green pencils, 2 yellow, 2 blues, brown and tuscan red. It was invigorating once I realized it would indeed look like a green apple. Now the red apple was another story!
I have the colours for the red apple for the demonstration and will post them soon. If it weren't so darn complicated I'd do green, but that's a lot of pencils required!

Thursday, 10 September 2009


I suppose by the time I get to read the current edition of the OPE zine it will be a wee bit dog-eared. Who knew the coloured cover flavours matched their milk bone counterparts!

Wednesday, 9 September 2009

Coloured Pencil - Part III

Useful Tools

Useful tools include some sort of soft brush or your own hot air to blow/brush away any pencil crumbs that can mark your paper in places you don't want it to; kneaded eraser to pick up colour by dabbing it on the place you want to lighten (I'll demonstrate as required when working on the painting.) and a paper with a hole punched out of it to assist you in determining whether or not your values are correct; If you happen to have an electric eraser around you are a lucky person and although it's not required, is a whole lot of fun. I use mine for blending as well as erasing and want to be burried with it when I die.


Pencil Strokes


Here are the pencil strokes you will use for this particular painting.
Linear Stroke: Is simply colouring in straight lines. Try and vary where they start and stop otherwise you will develop a line at the top and bottom of the area you are colouring. You can keep your pencil touching the paper the whole time. This is a nice fast way to cover an area with colour. The amount of pressure you put on the pencil will depend on how much colour you want to apply on that layer. I'll let you know as we're going along how much pressure to apply.
Multidirectional Stroke: Is very similar to the linear stroke only you switch directions with each layer. This gives you a nice even coverage with no visible directional lines.


Scumbling: What a word! It is indeed a proper colour pencil term meaning working in small tight circles. It is time consuming, but will give you the best coverage. You require a sharp pencil for this stroke for the best effect. The more layers you put on top of each other the less tooth the paper has. This is a great stroke for something that should have none of the paper showing through.


Follow the Contour


When we are using the above strokes we will still be following the contours of our object. You would not draw in straight vertical lines when colouring a curved object. You can still do a "linear stroke" while following the contour of our apple.

Sharpness of Your Pencil


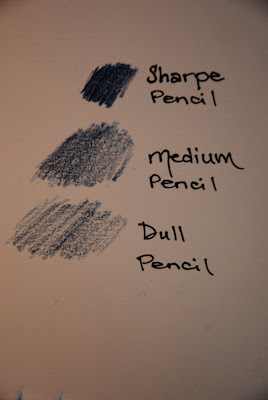
The sharper the pencil the better coverage you will get. Dull pencils tend to just slide over the tooth of the paper leaving a lot of the white. Sometimes this is valuble but for most of our painting we will require a sharp or medium sharpened pencil.


Value Scale


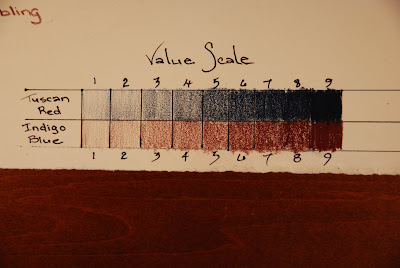
Okay....switch the names around then this will make more sense. Not enough coffee today I guess. Tuscan is the bottom scale and Indigo is the top scale.

You don't acually need to make a value scale, but they are useful and good practice. They will help you get a feel for how hard to press your pencil to get the value you want. You may already have some experience with creating value scales. If not, then basically you decide on a number of values (lightness and darkness) you would like to be able to obtain with one colour. You draw it at the lightest you can at one end and darkest at the other. Then fill in what you determine would be a good middle value. Then you fill in the rest going from lightest to darkest or vice versa. This will assist you to determine which value best matches the part of the photo you are drawing.

Impressed Line


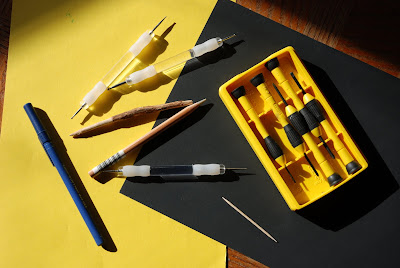
We will use impressed line to put the little pale dots on the apple. It involves using a pointy object to impress a small area, a dot, line, etc.... into your paper. Make sure the object is not sharp enough to cut through or score the paper. You just want to be able to "dent" the paper enough for the pencil to slide over the top of the paper in that section. If you use a spent pen make sure that there is absolutely no chance that any ink will come out otherwise you will ruin your painting. At this point you should each chocolate and start again at the beginning.


To impress a line use a piece of wax paper or tracing paper between your good paper and the stylus so that the stylus will in no way leave any undesirable colour marks behind. With a firm but not manic amount of pressure impress the lines, dots, etc... that you want to appear. Sometimes it helps to have them drawn out so you can see exactly where they are going.


When you colour over the area you just impressed it's better to do so with a medium or duller pencil. You don't want to press into the impressed area with a sharp pencil or it will fill it in. On the otherhand, if you have impressed something in error, using a sharp pencil to fill in the impression is just what you want to do!
The last technique I want to quickly mention here is burnishing. This is akin to polishing your painting when it's done. If you use Prismacolor pencils they are wax based. When you have all of the layers and colours you want on your apple you can use a "colourless blender" which is a coloured pencil with no colour or a tissue or your dry finger. You polish the areas you want to shine and voila! It's all shiny just like a real store apple only without the pesticides!

If you put your painting aside at any point and notice when you come back to it that it looks duller or have a whitish film, this is called WAX BLOOM. You can re-polish it and the wax that has risen to the top will be removed once again showing the coloured pigment. The only way to totally avoid this is to spray your painting with a fixitive when you are completely done.

Wax bloom occurs generally when you are using dark colours or heavy layers of colours. The wax rises to the top and the pigment settles down below.

NEXT TIME:

Prepare to colour! I will post the pencil colours required once I start the painting myself and determine which ones we will require. The particular ones I choose may not be what you decide to use. Variety is the spice of life right?! (Mr. P. ....Ignore that last comment. It's not meant for you!)

Now....Go and eat some chocolate. I know I'm going to!

Tuesday, 8 September 2009

Coloured Pencil - Part II

Now that you have your outlined copy of the photo on a scrap piece of paper it's time to put it on your good paper. Hopefully you have a piece of "Stonehenge" or "Bristol (vellum)" or other paper with a good tooth.


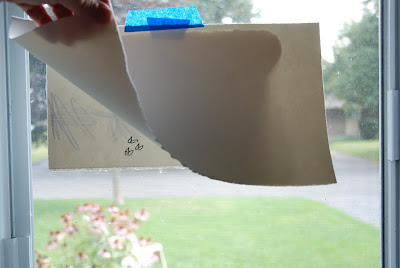
Tape your original drawing to a bright sunny window with your low tack tape. Tape your good piece of paper over top. It's probably a good idea to make the good paper larger than the scrap paper. It will give you extra should you decide to frame your masterpiece or make additions to the setup. You will be using your window as a low tech light box.


Now GENTLY trace the image onto your good paper. DO NOT PRESS HARD! If you press too hard or use a hard leaded pencil it will impress a line in the paper to which the coloured pencil will glide over not leaving any colour. This is a technique we will be using later but not at this time. Also avoid using a pencil that is too soft as it will be more difficult to erase. I like to use a B lead.


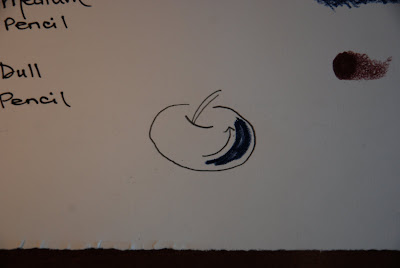
You may wonder why we are bothering with this step and not sketching out our good copy directly onto the good paper. The less erasing and pencil marks you put on your good paper the better. Erasing flattens the tooth of the paper thus making it unable to take as much coloured pencil as you may like. The key to creating a coloured pencil painting with depth is to layer the colours on top of one another. For example we will use blue as our first colour to create the dark shaded side of the apple. We'll then layer various reds to give it depth and closer resemble the colour of an apple.


Now you are ready to start colouring. All of the lines you currently have on your paper will eventually be erased to be replaced by coloured pencil. In the end when your picture is done it will be all shading and no lines.

NEXT TIME:

Before we can actually tackle the apple we'll need to go over a few necessities. I'll post some examples of coloured pencil techniques, strokes used and suggestions. The meat and potatoes of the process as it were.

What you will need:

*a kneaded eraser

*coloured pencils (two colours would be great. I suggest Indigo blue and Tuscan red from the Prismacolour premier series collection. These can be purchased open stock for approx. 1.50 per pencil (Cdn) SEE NOTE BELOW

*Something pokey. A spent ball point pen, stylus, toothpick...you get the idea.

*A small piece of your good paper

*Chocolate (We're past the dog stage)

There are many good quality pencil companies out there. You need an artist quality pencil, not the student quality ones. Derwent and Faber-Castell also have wonderful pencils. If you choose one of these then pick a dark blue and brownish red. (heavier on the red side than brown.) These are two of the colours you will actually use to colour your apple when we start.